Pages

Tuesday, July 12, 2011

Backstitch

backstitch1.jpg
Bring the needle and thread from the back to the front of the fabric.  Put the needle down through the fabric about 1/8-inch away from where you started (For right-handers, it may feel more natural to move to the left; left-handers may prefer the right).
Bring the needle up approximately 1/8-inch away from where you went down.  Pull the thread through.  Put the needle back down in the same spot you did before, taking a backstitch. 


backstitch.jpg 
source: http://www.purlbee.com/embroidery-tutorial/2007/2/12/backstitch.html

Monday, July 11, 2011

Tutorial: Latitude and longitude vintage inspired throw pillow

Before I do anymore introducing, I want to give you a sneak peek of my project for today!

I am a new graduate who is so SO so enjoying new found free time CRAFTING like CRAZY!  I am willing to try ANYTHING but love the basics!  I love anything that is meaningful or special...I try to live by this when I decorate and create.


But enough about me and on to the fun part, the crafty part!


But first let me explain!  If you can't tell from some of my above pictures of past projects, my house currently has a bit of a beach-y cottage-y feel that I am SO enjoying this summer!
I am undoubtedly inspired by the lake right down the road from my new home---lakes are SO my kind of heaven!
SO, I decided to make a pillow with the latitude and longitude of my new lake---that is so special to me!


Special and it matches my beach-y themed house...that is my kind of project!


Step 1. Find an old pillow to up-cycle
Step 2. **Here is where I must caution, I am by no means a sewing pro like Miss Maggie, I like to do the easy version...which literally took me about 20 min. tops to complete...so read with caution!  

I sewed two "layers" of my pillow:
The first layer to ensure the bright orange was covered up and because I wanted the same material to show through at the ends where I tied the sides together with ribbon.  
The second "layer" I just sewed the 3 sides together and finally the 4th side over to create a clean appearing edge.

{I think this picture should help you better understand the "layer" thing!}


{See that inside layer tucked in there??  And the outside layer with the folded over edge??}


Step 3. I used the "citra solv method" (I use this one about once a week on my blog it feels like).... to transfer the lake name and coordinates (which I found on yahoo) from a printed page straight to the fabric.
Step 4. I sewed the ribbon onto the edges by pinning them and then sewing.


{This is the finished look!}


Thank you again for letting me hang out with you guys at wonderful Midwest Sewing Girl and again, I would LOVE it if you wanted to come and visit when you have a chance!
 

Sunday, July 10, 2011

Tutorial | Quick Homemade Cards

I love giving homemade cards. Come to think of it I like giving homemade... everything! I especially like cards though, they are a simple way to add a nice thoughtful touch. Recently I found myself needing to make 8 cards for 8 lovely ladies but I was a little pressed for time. I thought of just using this pack of cards I found at the dollar section of Jo-ann but then I wondered if there was a quick and easy way to spice them up a little bit.
Yes, yes there was :)
I used this tutorial to make the flowers. Believe me when I say that these are easy. Just a bit of cutting, rolling, a dab of hot glue to secure and you have yourself a lovely little rosette.
I made a bunch of these pretty flowers (I especially like the book page ones) and cut out some leaves.
Then just glued them to the cards, done! Now my dollar pack of cards had a nice homemade touch and they only took a little time to make.
Here are some other dollar pack cards that I added a few simple elements to to make them pop. It is a nice solution/shortcut if you don't have much time to spare.

Thursday, July 7, 2011

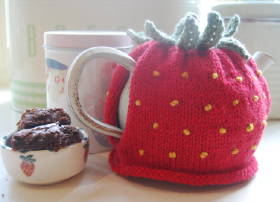
Aid Breast Cancer Care & Knit a Libby Tomey Tea Cosy


This pattern for a gorgeous strawberry tea cosy has been created by Libby Tomey to highlight the fact that she holds a Strawberry Tea event every year to raise money for Breast Cancer Care to show support for her aunt who was diagnosed with breast cancer. Feel free to make use of the pattern but please do make a donation to Breast Cancer Care as a thank you, and perhaps think about holding your own strawberry tea event!
 The charity’s Strawberry Tea campaign runs throughout June, July and August and raises vital funds to support the 50,000 people who are diagnosed with breast cancer every year in the UK. The are encouraging you to host garden parties, picnics, cake sales and even themed fancy office tea breaks – and a Florence tea cosy will be just the accessory to set the tone!

Big Sis, Little Sis Owl Messenger Bags


Hello...

I'm Jo from Jo's Country Junction. I am so excited to bring to you my latest Moda Bake Shop project, "Big Sis, Little Sis Owl Bags." You can make one bag or both bags. If you read on, you will even find out how to get instructions for a matching tiny baby owl bag that can be used as a coin purse. Grab some "Just Wing It" fat quarters and a little bit of yardage and let's start sewing.


Large Bag (10" x 11")
1 fat quarter for outsie
1 fat quarter for inside
1/4 yard for binding
1/3 yard strap and inner pocket
2-1/8 yard cuts for eyes and beak

Small Bag (6" x 7")
1 fat quarter for outsie
1 fat quarter for inside
1/4 yard for binding
1/8 yard strap and inner pocket
2-1/8 yard cuts for eyes and beak


Buttons for eyes
Scrap of DecoBond
Scrap of Heat and Bond
2 Scraps of leftover quilt batting the size of your fat quarter

Please note: THE INSTRUCTIONS ARE GIVEN FOR THE SMALL BAG. TO MAKE THE LARGE BAG USE THE MEASUREMENTS IN PARENTHESES.


Draw out a pattern using the following measurements. This will be the front and back of the bag.

Base 7" (12")
Height 6" (9")
Top 4.25" (9")


Cut a 12" x 20" (18" x 21") piece of fabric from your fabric that will be the outside. Cut a piece of batting that is slightly bigger. Machine quilt the to pieces together using a scalloped type quilting pattern.

From the quilted piece cut::
2 of the drawn pattern
2-2.5" x 6" pieces (2-3" x 9")
1-2.5" x 7" piece (1-3" x 12")


Pin the 6" pieces to the 7" piece as shown. Sew between the pins leaving a 1/4" not sewn at each edge. Do this for each end.


Pin the front piece to the side pieces as shown. Again, sew between the pins leaving a 1/4" not sewn at each edge.


Pin the side pieces to the front as shown. This time leave a 1/4" not sewn only at the base of the purse only. Sew to the edge of the top. Sew both sides the same way.


Sew the back piece in place by repeating the last two steps.

Turn right side out.


From the lining fabric cut::
2 of the drawn pattern
2-2.5" x 6" pieces
1-2.5" x 7" piece

From a contrast fabric cut 2-4.5" x 5" (6.5" x 6') pieces for an inside pocket. Put the pieces right sides together. Sew around the edge as shown leaving an opening. Clip the corners. Turn right side out. Hand stitch the opening shut.


Stitch to the back piece as shown.


Now assemble you lining using the same steps that you used to sew the outside of the bag together. Clip the corner seams.


Now tuck the lining into the bag putting the WRONG sides together. Pin the seams together as shown.


Cut 2-2.5" strip of fabric for the binding. Using one strip, bind the top edge of the bag just as you would bind a quilt. I sewed the binding to the outside and flipped it over to the inside, hand sewing the binding in place.


To make the flap, cut a 5.5" x 5.5" (11" x 5.75") piece of lining fabric and one the same size of the machine quilted pieces. Layer them wrong sides together. Bind three of the sides with the other 2.5" binding strip.

Find the center of the back side of the bag. Find the center of the flap. Match them up as shown. Pin the flap in place about 1/4" below the binding strip. Sew into place.


Trim the seam to only 1/8". Turn the flap into position. Pin in place. Stitch 1/2" from the fold covering the raw edge.


Using the beak pattern provided in the printable version, cut two beaks from fabric and one from decobond. Put the fabric pieces right sides together. Layer that on top of the decobond piece. Sew along the two curved sides using a 1/4" seam allowance. Trim. Turn right sides out. Iron. Turn the straight open edge in, iron.


Sew the beak in place on the center of the flap as shown.


Free pattern: City Weekend quilt by Liesl


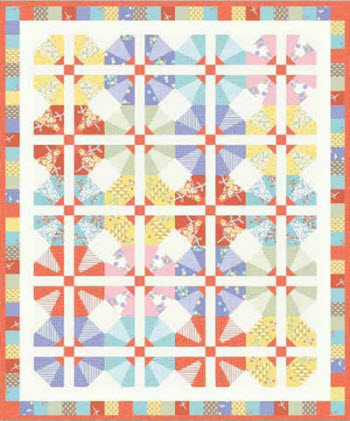
I heart the City Weekend fabric collection by Liesl Gibson, founder of Oliver + S. See my earlier post here. I just spied this City Weekend quilt pattern that showcases the line. It’s spectacular! Get a link to the free downloadable pattern and see some photos of this quilt made up on a child’s bed over at the Oliver + S blog.

Free pattern: Ollie Owl softie


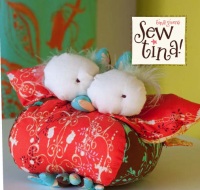
You can find a free pattern and tutorial for making this cute Ollie Owl softie over at Lark Crafts.  It’s designed by Tina Givens and is an excerpt from the book Sew Tina! Go to the pattern and tutorial.
[photo from Lark Crafts]